Sunday, November 21, 2010

Filet crochet portrait progress

Hello world,

I wanted this to be done soon, but as you will see from my progress below, it's slow goings. I knew it was ambitious, but I thought I'd be at least half way by this stage!

I have spent a number of days listening to my favourite TV shows and to some audiobooks while working on this, and I try to get at least a row done to and from work each day on the train. Apparently that is not enough. Nonetheless, I did foresee that problem and mitigated the risk by starting at the top, so the date was one of the last things I would crochet, just in case I blew out my deadline.

It is turning out really great, so the excess time is worth it.

MUM OR DAD, IF YOU ARE READING THIS, AVERT YOUR EYES IF YOU WANT THIS SURPRISE TO BE A SURPRISE, EVENTUALLY.

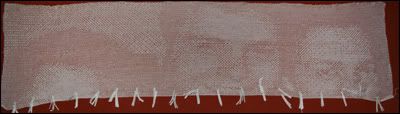
My progress after two months' work:


What did I tell you? surprisingly good. :) The little white things along the bottom are just stitch markers so that if I get lost I don't have to start counting from the beginning of the row... 300 stitches is too many for me to count back.

Here's another shot showing the detail of what the work actually looks like to me while I'm working on it. I only see it every now and again when I find the time to lay it out flat and review my progress.


So! Still a long long way to go, but I am encouraged by the result thus far. I'll post the final product up both before and after framing... whenever that may be.

Crochet cotton is from the lovely people at Crochet Australia, who you can hear about in a previous post.

Read my previous post to learn how to make your own filet crochet portrait from a photo:


Au revior,

~Eyespiral

Friday, November 19, 2010

The ultimate engagement ring - challenge 5

Challenge 5: Those three words

Vote for us and help us get engaged - we're in competition for the ultimate engagement ring!


Hello world,

Challenge 5 is to share the first time that either of us said 'I love you'. That was me. It is embarrassing and sickly cute. Forgive me by voting for us! :)

To learn more about the contest for the ultimate engagement ring, see my original blog post or visit www.my22ct.com.au

Here's our entry:

Jessica was always a pragmatic girl, and she thought teenagers who convinced themselves they could fall in love with their soul mate at age sixteen were rather ridiculous. But after a few months with EJ, she was becoming a hypocrite.

It had been about three months since they’d become a couple, and against her most logical self-arguments, she realised she was in love. So what did she need to do now? Tell him.

She always caught the late bus home so that they could spend a little time together after classes finished each day. It meant being stuck on the shoppers bus that crawled through town and got her home after 1.5 hours, but she always felt it was worth it.

This afternoon, they stood under one of the trees out the front of the school in each others’ arms. She had her cheek pressed firmly against his shoulder – she was too scared to lift her gaze.

Jessica was so nervous, in fact, that she couldn’t bring herself to tell him those three words in plain English. She and a girlfriend spoke a pretend language they called ‘Double Dutch’ throughout high school, and EJ understood it. Basically, it required you insert ‘vg’ at the front of each syllable you say.

It was hard. Scary. And so she stood there, face hidden in his oversized t-shirt, and told him, “Ivgi jvgust wvgantvged tvgo tvgell yvgou tvgat Ivgi lvgove yvgou (I just wanted to tell you that I love you).”


To help us win all you need to do is vote for us by clicking on either the ring photo or text links provided above. You need to log in using your Facebook or Twitter account and then you can vote for each challenge that we complete. Please try to vote for every one to give us this once in a lifetime chance!

Monday, November 15, 2010

The ultimate engagement ring - challenge 4

Challenge 4: Our meeting stories

Vote for us and help us get engaged - we're in competition for the ultimate engagement ring!


Hello world,

Challenge 4 is to share the story of our meeting - from each of our perspectives. It's not so differnt, actually... but I'll let you judge.

To learn more about the contest for the ultimate engagement ring, see my original blog post or visit www.my22ct.com.au

Here's our entry:

Jessica's story
The first time I heard his name was when we were starting year 7 and our entire grade were herded into the school hall to be separated into classes. His name made the school body froth when they heard it: Ebbenjay van der Hilst-Best. Like everyone else, I glanced up to look at the weird kid with the weirder name, and glimpsed a pale weedy boy with long shiny hair and a flushed face.

Three years later, I started seeing a boy who was a great mammoth of a nerd. He spent most recesses and lunchtimes in the computer lab, so I came along. As soon as I walked in the door, a lanky boy wearing a white shirt that hung from his frame like a sail from a coat hanger, and glossy hair that was now cut short, took one look at me and burst out in derisive laughter at his friend’s new girlfriend, the small exertion driving a rosy flush up his neck and cheeks. I walked out and refused to come back for all of lunchtime.

Eventually we started to sit together at recess and lunch, and eventually we got to know each other. That’s how we met.

EJ's story
When I first saw Jessica in early high school I knew she was smart. She looked like your stereotypical bookworm. She had long curly hair and big round glasses. She was pretty too, though she hid behind her glasses. I wanted to talk to her and get to know her but I was very shy.

After I found out that she was a friend of a friend of mine, I found the excuse I wanted to approach and talk to her. Then another friend of mine asked her out. I got mad at him: being in high school, I thought everything lasted forever and so I thought, ‘well, there goes Jessica’.

Fortunately, they didn’t last. I started spending recess and lunch times with Jessica’s group of friends so I could spend more time with her. After a while her friends and my friends started hanging out together and that’s when we really started getting to know each other.


To help us win all you need to do is vote for us by clicking on either the ring photo or text links provided above. You need to log in using your Facebook or Twitter account and then you can vote for each challenge that we complete. Please try to vote for every one to give us this once in a lifetime chance!

Monday, October 25, 2010

The ultimate engagement ring - challenge 3

Challenge 3: Our secret pet names

Vote for us and help us get engaged - we're in competition for the ultimate engagement ring!


Hello world,

Challenge 3 is to share our secret pet names. I have to admit, they're not really secret - we've never had a problem embarrassing each other with silly names in front on our friends. :)

To learn more about the contest for the ultimate engagement ring, see my original blog post or visit www.my22ct.com.au

Here's our entry:

EJ:  Eb-joy van dan der Sprite
Me:  Dessikins

I often sing "Eb-joyful joyful, how I adore you...". He is my little sprite. And Dessikins? Well it's adorable too. Silly? Yes. Embarrassing? Probably they should be. Vote for us!


To help us win all you need to do is vote for us by clicking on either the ring photo or text links provided above. You need to log in using your Facebook or Twitter account and then you can vote for each challenge that we complete. Please try to vote for every one to give us this once in a lifetime chance!

Thursday, October 21, 2010

The ultimate engagement ring - challenge 2

Challenge 2: Our reason

Vote for us and help us get engaged - we're in competition for the ultimate engagement ring!


Hello world,

Challenge 2 is to tell the world why we deserve to win the contest. It also becomes our profile description.

To learn more about the contest for the ultimate engagement ring, see my original blog post or visit www.my22ct.com.au

Here's our entry:

When I sat down to start writing this, I decided to interview EJ. And when I asked, “Why do you think we should win the 22 carat engagement ring?”, I expected some strategic answer. But he just smiled bashfully, lowered his gaze, and said simply, “Because I want to marry you.”

It made my heart glow and my ears tingle.

It’s really that simple. We are in love. We were high school sweet hearts. We tell each other “I love you” at every opportunity, even after being together for nearly 9 years. We make each other laugh. We’ve worked hard for the life that we have, and our team name is our motto: Even if the world is against us, we will arise victorious.

We fit together like puzzle pieces, so we can rely on each other to get through anything. I’m creative; he’s logical. I sing away the silence; he enjoys his quietude. I run early; he runs on EJ time. I feel more myself around him; he sometimes forgets that we are really two separate people.

He adores me; I would lose myself without him.

Help us live the fairytale. Thank you!

~Jessica

To help us win all you need to do is vote for us by clicking on either the ring photo or text links provided above. You need to log in using your Facebook or Twitter account and then you can vote for each challenge that we complete. Please try to vote for every one to give us this once in a lifetime chance!

Tuesday, October 19, 2010

An entreaty: the ultimate engagement ring - challenge 1

Challenge 1: Our favourite photo

Vote for us and help us get engaged - we're in competition for the ultimate engagement ring!


Hello world,

I know it's very trite to use a blog to beg for votes for a competition, however I have to use every channel available to me! After all, the prize means we can get married!


The contest is being run by Michael Hill jeweller & they're looking for the world's best couple to be awarded the ultimate engagement ring - see picture up top! I definitely think we can be in the running because EJ & I fit so well together - but we need your support.

The contest involves a number of 'challenges' which the couple have to complete in order to win. The first challenge we had to complete was to upload our favourite photo as a couple. This was an easy decision for us - we both thought of the above photo immediately. It's a candid shot that was taken by a friend during photography class when we were in year eleven, and I developed the film and the print myself.

I love the way that behind EJ are the parallel structured lines of the bricks and behind me are the organic shapes of the trees - it's really representative of the two of us.

I will be posting a note on this blog each time we complete a challenge. To help us win all you need to do is vote for us by clicking on either the ring photo or text links provided above. You need to log in using your Facebook or Twitter account and then you can vote for each challenge that we complete.

Winning this contest would mean such a significant step in our life; we really are a great couple, and with your support we can do it!

Sunday, October 3, 2010

How to create a filet crochet pattern from a photo using Photoshop

Hello world,

For those who don't know, filet crochet is a type of crochet that is based on a mesh made of blocks that are either 'open' or 'closed'. Great for the mathematically minded like myself, and there are lots of tutorials online to show you how to get started with this. It can be done using larger hooks and thicker yarn to create blankets, or fine hooks and yarn to create something more akin to lace.

I have been searching for a tutorial on how to covert a photo into a filet crochet pattern and I couldn't find one, so I've decided to write one of my own! Read on to learn how to achieve this.

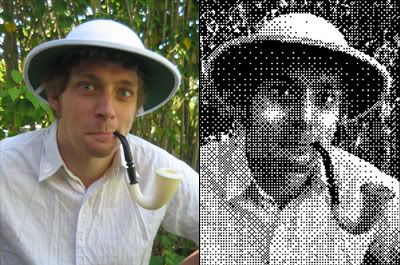
Before & after


There are processes for creating a colour crochet blanket, etc, from a photo, however this is not what I wanted to do. I not-so-recently completed a gorgeous peacock filet crochet in Coates Mercer 100 cotton that once belonged to my great grandmother and it is just so lovely that I wanted to see where I could go with it. Unfortunately my drawing skills aren't amazing like my brother Michael, so I needed to use my Photoshop skills instead of manually reproducing the photo. Oh, and I'll post a photo of the peacock soon.

I came up with the process because I am thinking of making an epic xmas gift, but because the person for whom I am making it may read this, I will say no more - for now. I wanted to make a filet crochet pattern from a photo. This is difficult for a number of reasons: Photos are high definition, they're in colour, and it is surprisingly difficult to figure out how to convert an image from colour to black & while only (i.e. with no greys).

However, I am determined, and like Photoshop, so here is the tutorial. I hope someone else out there on the world wide web finds it useful. :)


Step 1: Source your photo
Get your photo or image. Low-res is fine as filet crochet, unless making one of epic proportions, is also quite pixelated. What you want to focus on are images with high contrast. Striking patterns such as stripes, etc, are great for the background if you want them, but again contrast, not colour, is the key.

For this tutorial, I chose this loverly photo of my brother Tim, breaking most of the rules above. Not to worry, I embrace a challenge!

Original photo


Step 2: Adjust and convert to greyscale
This step is about your own judgment. There's lots you can do to get the best outcome, but at the most basic here's what to do: Crop as much as you can. Don't waste space with background if you don't need to unless you have plenty of time and yarn on your hands, else you will regret it later. Then select 'Layer > New Adjustment Layer > Black & White'. Fiddle around with the various sliders to get the effect that you want - remember you want to maximise whites, blacks, and have minimal greys.

I have Photoshop CS3 and I understand the 'Black & White' feature doesn't exist on some earlier version of Photoshop - in this case, select 'Hue/Saturation' instead and also create an additional 'Brightness/Contrast' layer to give yourself more control.

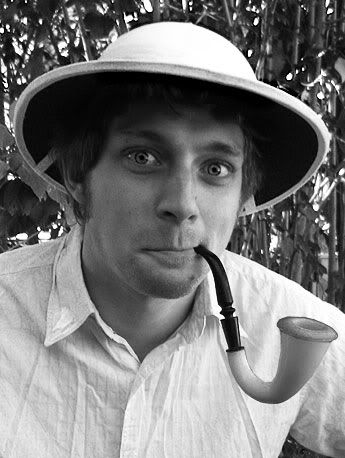
As I said, there are lots of things you can do to further enhance your image at this stage. To get the below image, I used 3x brightness/contrast layers to improve the definition of the end of the pipe and the overall contrast of the image, plus I used the burn/dodge tool to add definition at the brim of his hat and the eyes, then used the black & white adjustment layer and played with the sliders.

Greyscale photo


Step 3: Resize
At this stage you need to decide how large and how detailed a crochet pattern you want - each pixel becomes an open or closed block in the filet crochet mesh. The smaller the image resolution, the faster and easier crocheting it is, but the larger the better detail you get. To give you a notion of size vs. pixelage, I am currently working on an image approximately 300 x 150 px using a tiny crochet hook and size 100 yarn and it is looking to turn out about 1 x 0.5 metres in size, so look out.

For this tutorial, I resized the image to 150px width. Lower would lose too much detail and leave me with a greyish mess. I noticed my contrast wasn't great, so I decided to zoom right in and do some more work with the dodge/burn tools to improve the contrast I wanted. I know the below may look silly, but the end result can be greatly influenced by the modifications you make here.

To resize an image in Photoshop, select 'Image > Image size...' and input the settings you desire.

Pixelated adjustments


Adjusted small


Step 4: Convert to halftone
The bitmap halftone screen is how to reach a workable filet crochet pattern. To do this you need to complete two steps:

  • Select 'Image > Mode > Grayscale' and click OK to flatten and discard all colour information.

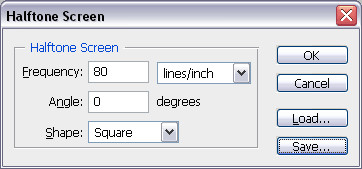
  • Use Image > Mode > Bitmap', leave the resolution as is and select the 'Halftone screen' method with the below settings, or download my settings and load them into Photoshop:

    Halftone settings


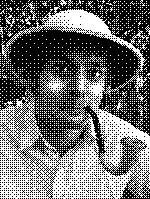
Click OK and in essence you've got your pattern. Here's mine at both 100% and zoomed in so you can see the pattern better.

100%


Zoomed detail


Step 5: Save the image

Press Ctrl+Alt+Shift+S to bring up the 'Save for web' or 'Save for web and devices' dialogue box. Save the image as a GIF file and it'll have a tiny file size due to being plan black & white. There's no need for transparency.


Step 6: Print and add grid

If you're nifty and/or OCD like myself, you can add a grid and resize the image before printing. However, in hindsight it is much easier to do it using the built-in Windows print picture function and add the gridlines yourself.

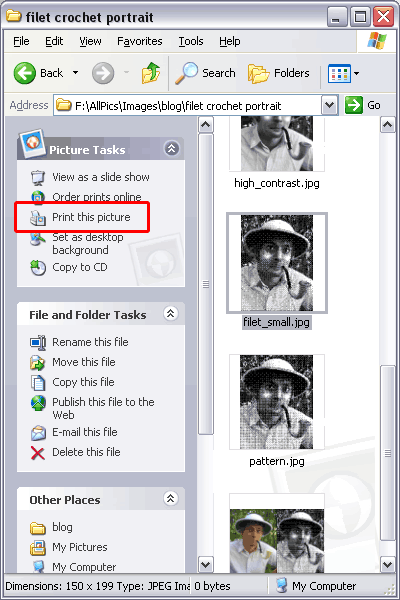
To print the image ready for use, go the the folder where you have the image saved, click the file so it is selected and then select 'Print this picture' from the folder options

Print picture


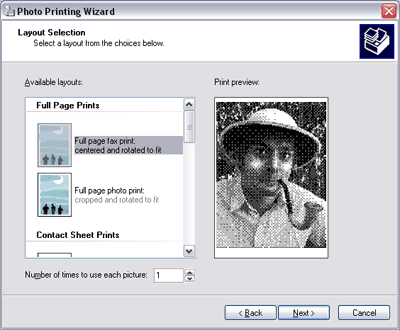
Then follow the prompts. When it gets to the 'Layout selection' step, select 'Full page prints' as shown below.

Full page prints


The image will print and really you can go ahead with just this. However, I always like to have my gridlines there to make sure I get the stitch count right, so to achieve this I recommend grabbing a mechanical pencil (for the fine tip and silver colour which will show up on both the black and white parts of the image) and a ruler and get to it. Another good idea is to rule a gridline of double thickness every 5 or 10 blocks to make keeping count easier.


Et voila!
You have now got a filet crochet pattern from a photograph. Congratulations! If you make one, I'd love to see! I promise I will post a photo of mine when it is done and gifted away. :)

Before & after


----------UPDATE JANUARY 2013----------

I ended up making this portrait for my brother for xmas just passed. Here's a photo of the finished product:


-------END UPDATE JANUARY 2013-------

Well I hope this was useful. Ooh, and if you're interested, here is a peek at the pattern for the peacock that I finished a while ago:


Peacock filet crochet


Au revoir!

~Eyespiral