Upon a few requests over at Threadbanger, I've decided to put together a quick tutorial for the spats I made to match my she-tails:
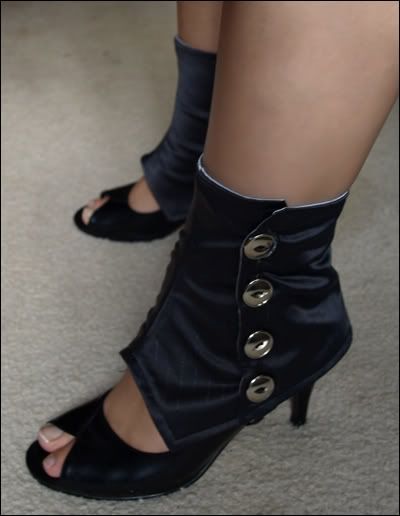
Apologies that I don't have pictures of the first couple of steps - I began making this pair before I decided to make a tutorial! :)
Materials and tools
- Main fabric - at least 1x0.5m
- Lining fabric - at least 1x0.5m
- Matching cotton thread
- Iron-on interfacing
- Elastic - 2x 10-12cm lengths; use thin elastic, like 5-10mm width
Method
1. Download Thank you for not being perky's spats pattern by clicking the image below:

2. Print the pattern and cut it out. Place the pattern pieces on the interfacing with the printed side up and cut two of each pattern piece. Then place your pattern pieces on the interfacing printed side down and cut two more of each piece. This way you will have one spat for each foot. You know what I mean! It's easier to visualise than to explain.
3. Separate your interfacing pieces in two identical piles (each containing 1 A and 1 mirrored-A, 1 B and 1 mirrored-B, 1 C and 1 mirrored C) and iron one pile to your main fabric, one pile to your lining fabric. Make sure you leave enough space around them so that when you cut them out you can add 1cm seam allowance. Also make try to ensure you put your fabric's max stretch going across the pattern pieces. Cut them all out with 1cm seam allowance.
4. For both the two mains and the two linings, sew the seams as indicated by the notches in Thank you for not being perky's pattern, i.e. piece B on the left side of piece A, C on the right side of A. You can see one main and one lining complete below.

5. Now snip little triangles out of the seam allowance and iron it open. Doing this will prevent puckering in the curved seams. Run a topstitch down both sides of the seam, securing the seam allowances as shown below.
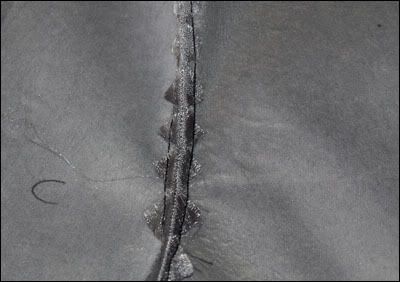
6. You will now be able to see the general form the spats will take. Fold over the front of one of the mains (i.e. fold piece C over onto piece A) so that the two peaks at the bottom of the front match, as you can see in the top part of the image below. You can see the position where the elastic should be attached. Mark this position on both your mains.
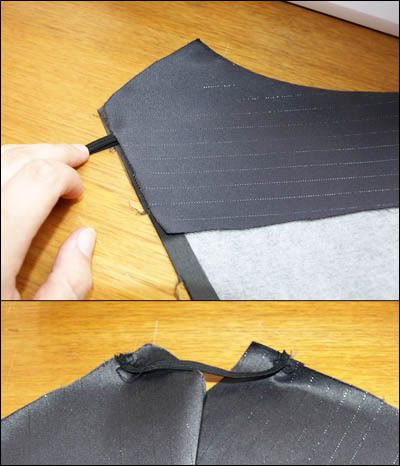
Baste your elastic in place on the main fabric. Make sure you sew it on the right side of your main, right near the edge of the fabric so that it will be hidden in your seam allowance in the finished product. (See the bottom part of the image above.)
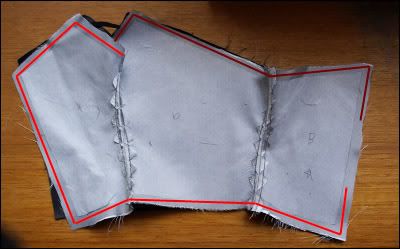
7. Now it's time to sew the first part of the perimeter. Place main and lining right sides together, then pin along the edge as indicated in the image below. It's important to do the perimeter seam in two parts, because the elastic pulls too much to get a neat seam otherwise. Make sure the elastic is hidden inside, between the main and lining.
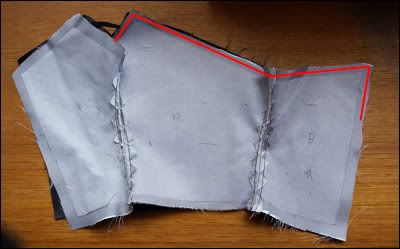
8. Now pin and sew the other part of the perimeter seam, leaving a gap for turning on the straight edge as indicated below. Oh yes, because of the curved seam, that little bit in the middle at the top of the work in my photo is just folded over. The seam really is continuous, since you will join the second part of the perimeter seam at the corner where the first seam ended. Once again, easier to do than to explain. :)
9. Trim the corners and then turn your spats right side out through the hole you left in the last step. Use something skinny to push the corners out so they're nice and sharp and heat up your iron.
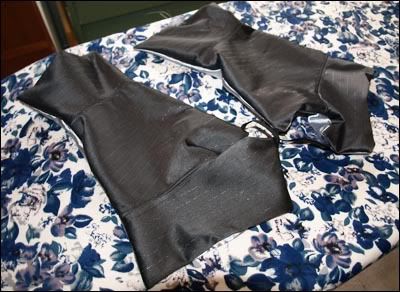
10. Iron it flat, tuck in the raw edges around the turning hole and pin it shut.
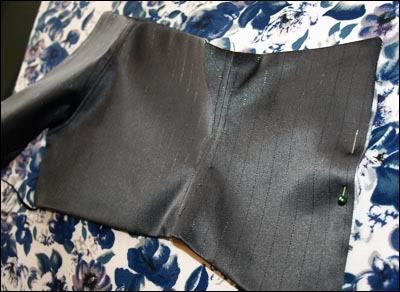
11. Run a topstitch around the perimeter of your spats to give them a polisehed look and to close up the turning hole.
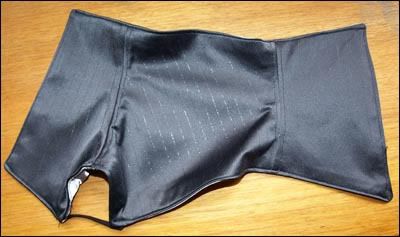
12. Add buttons and button holes and you're done! Note - if you suffer from the dreaded cankle like I do, you will want to position the buttons quite close to the edge of the spats so as to give you as much wriggle room as possible. Those with slender ankles, I envy you.
Et voila!
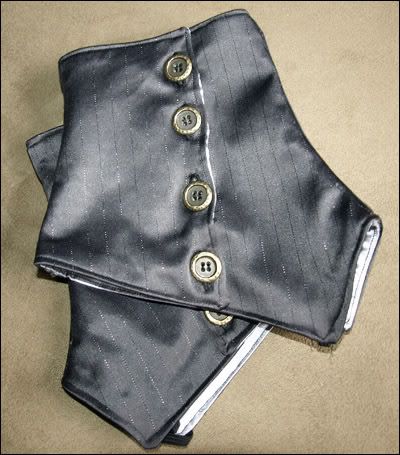
Alright. I hope you enjoyed this tutorial and that you will make yourself many and varied spats, because it's time they came back.
As a side note, I decided I will give this tutorial's pair away to the first person who leaves a comment saying they're interested and with a way for me to contact them. I don't want to call it a competition, because I disappointed myself by doing one very messy button hole and accidentally snipping a tiny hole (like 4mm) in the middle of the lining of one of the spats. As much as it pains me to be honest about these stuff-ups, I'd feel worse to send these away to someone without warning them about what to expect. Nonetheless, they're still pretty darn kewl, and no-one will see the lining hole when you're wearing them, and the button hole should be mainly covered by the, y'know, button. :)
[EDIT] Congrats Allegra, you will be seeing some spats in the mail shortly.
~Jessica


lol, i'm a horrible seamstress, so i will totally take what i can get :) i was actually reading the tutorial thinking "oh man, there is no freaking way i can do these..."
ReplyDeleteanyway, my email is trisannarose@gmail.com
my sister would def love these for her b-day which is coming up so i may attempt them if i don't win them :P
I have this bright purple pinstripe fabric that would be fantastic for these. Thanks!
ReplyDeleteGroovy, Corvus! If you can see your way to sending me a link to the finished product, I'd love to see!
ReplyDeleteI made an attempt at these because I cannot find them ANYWHERE but I can't sew to save myself!
ReplyDeleteHi Bex,
ReplyDeleteAre you using a machine or by hand? A machine is awesome, but at least this is a small project so if you're going by hand then it's probably a decent choice. The trickiest thing (beyond exercising you spatial recognition skills while putting together the pattern!) I think is probably the button holes. To escape that problem I'd strongly recommend heading to your local notions shop and grabbing some press studs - you can get some really pretty ones like the pearl-topped ones I used in my Seatbelt Covers Tutorial. They're easier to install as long as you have a hammer handy. :)
Send me a link to a pic when you're done, I'd love to see, and if you like I can post it up here to share.
~Eyespiral
Are these a one-size-fits-all type deal? Because I have quite small feet and am worried about them not fitting. D:
ReplyDeleteHi Holly,
ReplyDeleteThis is a one size fits all thing, but I wouldn't worry too much about whether they'll fit. Firstly, your toe can extend as little or as far out as it needs to from the end; it doesn't matter. Secondly, the only size issue I can see occurring is if you have calves/ankles any thicker than mine. I suffer a bit of canklism and so mine are not the slenderest and as a result, the fit is quite snug. I imagine with smaller ankles/calves you would just have a neat, comfortable fit.
I hope this answers you question. :)
I love these spats but I am never going to wear high heels. ever. Do these work on flat shoes, too?
ReplyDeleteThese ought to work on flat shoes - they were originally made for wearing over boots (the real ones, not posh high-heeled ones). However, this particular pattern may be slightly elongated for suit heels, I'm not sure.
ReplyDeleteIt would be a simple adjustment, if they need it. I recommend making one unlined spat out of some scrap fabric (you won't need much, they're really quite small) and trying it on - if it's too low, trim it and then make the adjustment to the pattern or just unpick the pieces of your trimmed mock-up and use those as your new pattern.
Was this helpful?
~Eyespiral
Very. Thank you so much!
ReplyDeletejust started these and its an awesome pattern - very customizable... into long toes, cut away heels..anything! I find the pattern is for a smaller shoe so give more width if you need a larger shoe fit (but do measure and copy all measurements down so if it fits right you know what = what and can make a mark up of the right size).
ReplyDeleteAlso - don't freak out!! if it looks too scary, cut out one lot of the pattern in an old fabric or calico, sew tabs to matching tabs and forget anything else this way you can get your head around how they come together, then go back and read the details for the beautiful finish on those spats shown. Remember just sew the 3 triangled tabs to the 3 triangled tabs on the other pattern part and the two triangled tabs to the matching two triangles... just match the tabs!
Thanks again for an awesome pattern and tutorial!
Thank you for this AWESOME tutorial and pattern. I have made myself some spats for my Halloween costume and i have blogged about it.
ReplyDeleteThanks for great tutorial I need to try it! Thanks
ReplyDeleteI came across this post recently - it is so awesome, thank you for writing it!
ReplyDeleteI am definitely a novice, and I wanted some advice... If I wanted to make these taller (like to go up mid-calf), which part/s of the pattern would I extend, A, B, or C? Thanks!
any chance you can design me the pattern to make these within the next 48 hours??
ReplyDeletehttp://www.amazon.com/Franco-Womens-Steampunk-Victorian-Covers/dp/B0087JBSFW
email z3sharkette@gmail.com if you can help please - willing to pay a token amount but this costume has already cost me a fortune so can't afford much.
regards
Jenny
Hi Bezba/Jenny,
DeleteGlad you like the pattern. I can't draft a new pattern for you but here's what I would do to customise the way you asked:
1. Print the pattern I have linked above and cut out the pattern pieces
2. The two main differences between this pattern and what you want are length and the location of the fastening (on the side vs. In the front). To move the location of the fastening, overlap the B and C pattern pieces so the button hole and button marks align and stick together (this removes the overlap designed for the button fastening).
3. Elongate the tops of your now-2 pattern pieces. The top is above the letters on the pattern pieces when you read the letters right-way-up. If you follow the existing angle you should see they get a bit wider the longer you go - that is to accommodate the increasing width of the calf. Don't worry too much though - your laces will make the design quite flexible.
4. If you wish, make a quick unlined mock-up using some calico or an old sheet or pillowcase. This is an optional step to make sure you're getting the shape right.
5. Proceed with the tutorial except treat the highly curved edge as the fastener edge (since you have eliminated the button fastening). The highly curved edge (to the right side of pattern pieces A and C above) is the front of your spats where you will place your laces.
6. Get an eyelet kit or two (depending on the number of lace holes you want) and install them in pairs down your fastening edges. Thread your laces and you are ready to rock!
Let me know how you go. :)
~ Eyespiral
Merci beaucoup, thank you, for great tutorial, look for my blog: http://lamuloterie.blogs.marieclaireidees.com/
ReplyDeleteSophie, St Emilion, France......
Thanks so much for this pattern! I don't have a sewing machine, or iron, (or very much sewing experience) but I was able to hand sew these!
ReplyDeletehttp://img.photobucket.com/albums/v449/Sherio88/Picture76_zpsff732b1f.jpg
love the spats, thanks for sharing will be trying these, would love to make a Victorian pair
ReplyDeleteSo thankful to you for this tutorial. I am making a very classy Madd Hatter outfit which could use some spats for the final touch.
ReplyDeleteThanks very much!
superbes !!!!!
ReplyDeleteGrand Merci !!!!!!!! Beaucoup
ReplyDeleteThis could be one specific with the most beneficial blogs Longboat Key Tutoring We have ever arrive across on this subject. Really Wonderful. I’m also an expert in this topic so I can understand your hard work.
ReplyDeleteIts very helpful for me to make the Spats professionally.Vero Beach Tutoring The quality of content is fine and the conclusion is fine.
ReplyDeleteThanks for excellent blog.I'm happy to find useful blog share in my friends. Private tutor Alpine THANK YOU
ReplyDeleteThis comment has been removed by the author.
ReplyDeleteIts wonderful blog really very nice site and blog facility.every title is very nice and very fatastic concept.Private Tutor in Jacksonville Thanks for sharing the information.
ReplyDeleteThanks for the tutorial and the link to the pattern!
ReplyDelete