
Just the other day I finished making this lovely companion cube softie for my darling EJ for our anniversary on 6 March:
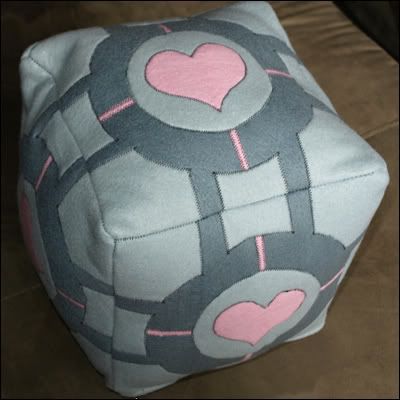
If you don't know what a companion cube is, you can find out here. Basically, it's from the game Portal. You use it to help you complete the game's tasks. And the cake is not a lie.
Anyway, I decided that I would make one of these for my honey because I know he'd appreciate the effort. And I thought I'd post a tutorial of it in case anyone else thought it was a good idea. :)
Materials and tools
- Dark grey felt - you'll need a fair amount of this, 60x90cm at least if you want to make one the same size as mine, i.e. 25x25x25cm when finished.
- Light grey felt - I got half as much as the dark grey
- Pink felt - you only need a little bit of this, enough for 6 hearts and 24 little lines.
- Cotton thread - I chose black as a contract, you can make your own decision. :)
- Stuffing/hobby fill - Use whatever you can find. If you're into repurposing, get an old pillow or two from the op-shop and use the filling in there.
Method
1. Download my pattern by clicking on the image below, or make your own. As I mentioned above, this pattern is to make a cube that's 25x25x25cm when finished. Print it, stick the two pages together and then cut out only the main square. Don't cut it up into little pieces until I say to further on. By the way, I've included 1cm seam allowance around the perimeter of the square only - the rest doesn't require it because the felt won't fray.
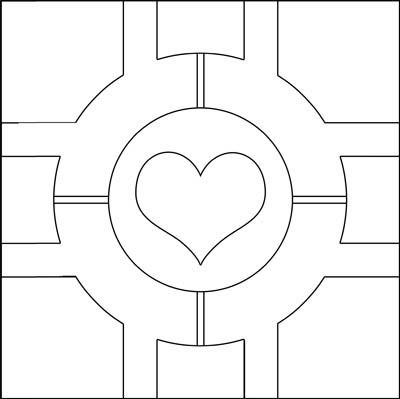
2. Use the square pattern to mark out six squares on your dark grey felt. They'll be 27x27cm because of the 1cm seam allowance. Cut them out.
3. Cut out of the pattern the areas that will be light grey - i.e. a corner piece, one of the little kinda C-shaped pieces in the middle of each edge, and the circle. Use these to mark on the light grey felt. You will need 24 corner pieces, 24 C-shaped pieces and 6 circles. Cut out your felt.
4. Cut out from the pattern the heart and one of the little lines that go from the circle to the C-shaped pieces. Cut 6 hearts and 24 lines from the pink felt - make the lines a bit longer than the pattern piece.
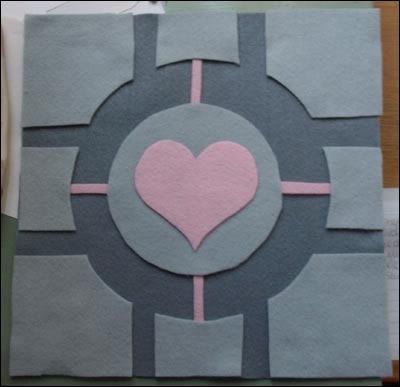
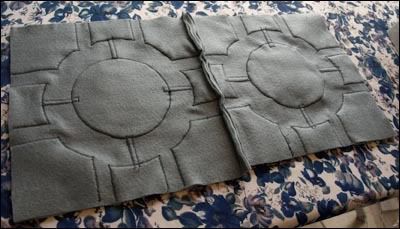
5. When you arrange all the pieces, each face should look like the picture below.
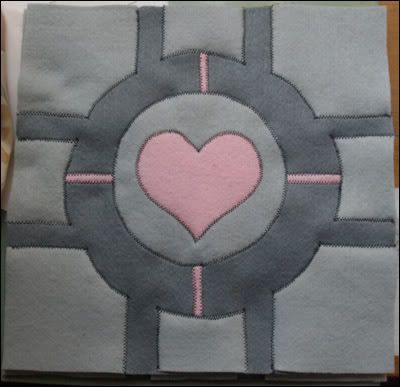
6. Now it's time to applique all the pieces in place on all the faces. I did them in this order: corner pieces, little pink lines (so their ends end up beneath the other two pieces), C-shaped pieces, applique the heart to the circle, then the circle to the face. When you're done, the faces should look somewhat like this:
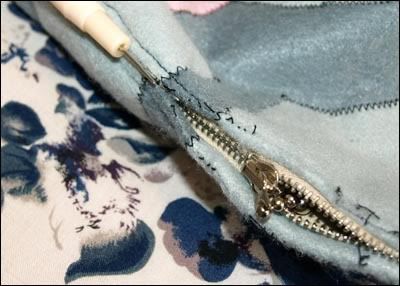
7. If you want to make it more true to the game, you could stuff the corners and C-shaped pieces now, but I didn't think it was necessary. The next step is to install a zipper between two of the faces. If you know how, go ahead and do it, then skip ahead to step 10. If not, I'll explain how I do it, even though it's a bit... unprofessional. :)
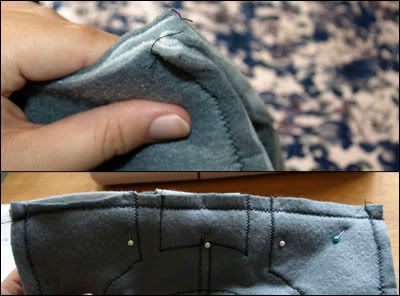
Place two faces right sides together and run a seam with 1cm allowance down one of the edges. Use a straight stitch with the longest length your machine will allow.
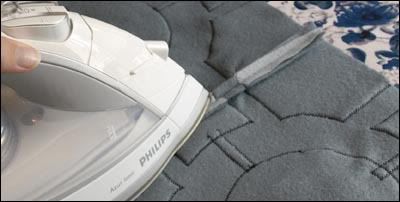
8. Iron the seam allowance open, then pin your zipper over top of the seam.
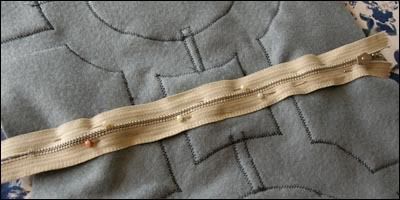
9. Use a zipper foot and sew down the length of the zipper, turn, and up the other side. Now you can unpick the seam, et voila! A zipper for you.
10. Open the zipper. Proceed to making the cube. Now, I will try to explain it here but you'd do will to look at this cube tutorial, which most likely explains the whole cube-making process a bit better.
Okay! Get two more faces and attach them with a zigzag stitch so that you form a shape like the one below. When you're doing this, make sure to start and end your seams 1cm away from the edge of the fabric. This comes into play when you attach the last two faces.
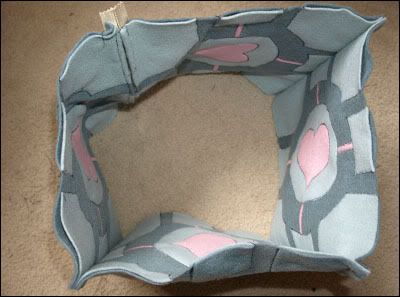
11. Now take one of your final faces and attach two opposite edges of it to corresponding edges in the existing work, as pictured below. This is why we left that 1cm at the edges of the seams, so that you have a nice clean edge to sew these seams. Leave the same 1cm at each end again for these seams.
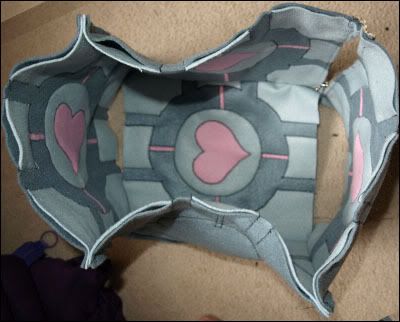
12. Okay, now it's time to create some square corners. Take one of the remaining open edges and fold in the two faces on the sides so that you get a flat edge to work with, like pictured below. Pin it lots and then run a seam along this edge, but don't leave 1cm at each end this time. Repeat with the opposite edge.
13. Repeat steps 11 and 12 for the remaining face. Aren't you glad I directed you to that other cube-making tutorial?
Now you should have a cube like below. Turn it right side out through the open zipper.
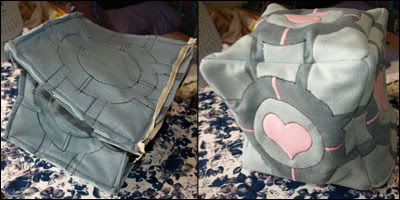
14. Now get out your stuffing and fillerup!
And there you go, you are the proud owner of your very own companion cube softie.
I hope you liked this tutorial, and I'd love to see a picture of any companion cubes you make!
~Jessica


This is really neat! I like the clean look of it!
ReplyDeleteI'm glad you like it, Kim. :)
ReplyDeleteI wanted to make cubes out of thrifted fabric to use as storage bins to sit in my bookshelf. Thanks! Seeing your process is going to help.
ReplyDeleteHi Jill,
ReplyDeleteGreat idea! You should look at crazy mom quilts's tutorial for her fabric storage cubes, they are fast and easy and probably easier to follow than this companion cube one. :)
I just printed out the pattern and the top half of the cube is smaller than the bottom half. Is that my printers fault or has anyone else had this problem?
ReplyDeleteHi,
ReplyDeleteSorry for the problems with the pattern - I can't replicate them on my end. Can I suggest using two copies of the first piece to stick together for the majority of the pattern, and then creating a separate heart shape in MS word or something to finish the pattern off?
My husband loves Portal and I have been looking for a pattern and tutorial everywhere. Thank you so much!
ReplyDelete@Marie UK
ReplyDeleteGlad you found it Marie, if you like please send me a link so I can see how it turned out. :)
~Eyespiral
@Eyespiral
ReplyDeletehey, can i ask if anyone knows where to buy felt for this online? im trying to get it but its gonna cost me £20 which seems excessive.
fucking awesome :D thanks
ReplyDeletehuh. i dont know portal, but this is pretty great.
ReplyDeleteYour zipper "cheat" is absolutely brilliant.
ReplyDeleteim gonna make this for my bf :) already got the materials hehe thanks!
ReplyDelete