
Hello world,
Soon I'll be posting pictures of a few fun projects that I've whipped up in limited time - a Combi cushion for my little sister who we call miniTim, a Black Swan style tutu for her costume for her birthday party, and a quick and fun craft utility aprol for mum for mothers day. I might even do a tutorial for the tutu since finding a decent tutorial was such a challenge!
~Eyespiral
Monday, May 2, 2011

Saturday, March 12, 2011
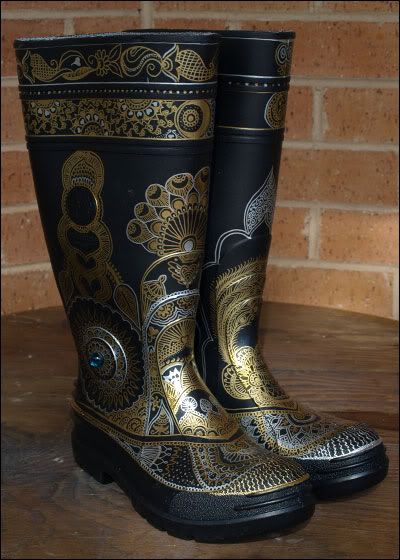
Custom gold and silver henna patterned gumboots
Hello world,
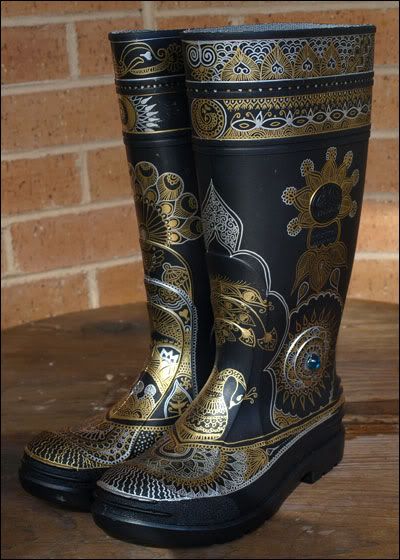
Here they are! My beautiful custom gumboots. I may even do some more work on them in the future... depending on how I feel. There's space for more but I do love them as they are.
To replicate these all you need is:
I also used a couple of stick-on jewels I had left over from my cake pop bouquets a few years ago. If you're planning on adding anything like that, I suggest using construction adhesive (in careful quantities) because hot glue won't stand the elements (Selleys in a good brand; they even have one specifically for rubber).
Method: Just go for it! Hmm, but if you're concerned about not getting it right first time, I'd recommend first doing some practice on paper. e.g. I made one of my zine-per-diems just henna patterns - they're fun, pretty, easy even if you're not good at drawing, and you end up feeling quite calm and tranquil while you're doing it.
For a great resource on the mechanics of drawing henna patterns, as well as examples of some masterpieces and descriptions of the different styles of henna around the world, check out The Henna Page.

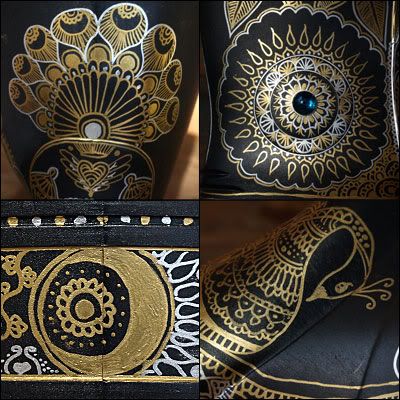
What's the story?
I decided to make these beautiful gumboots for an adventure EJ and I were planning - foraging down an old abandoned train tunnel at Helensburgh. We originally discovered the place while geocaching - Dub Side of the Moon is hidden sneakily at the mouth of the dreamy location. Take a look how romantic a scene it is:

Sorry for the low-quality image - we left the photo-taking 'til the sun was high in the sky and it was a sweltering 40°C, making for harsh lighting conditions. That and trying to hash the image size down for the internet means this doesn't even show you a fraction of how beautiful this place is - if you're anywhere nearby, go and check it out!
Inside there was an escape from the stifling heat, not to mention a canopy of glow worms that have aligned themselves with the old brickwork. The mud is the perfect thick glompy kind, and you see frogs hopping around and other creatures too.
The mud was the reason we left exploring the tunnel for another day - giving me a week to make these babies! Below is a comparison - my gummies in their, uh, natural habitat on the left, and on the right, after our adventure.
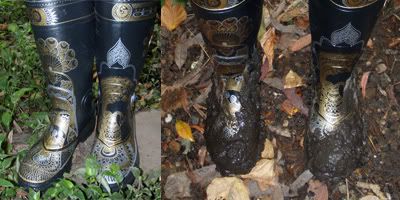
Yes, they survived. The mud came off easily, and any spots that had dried too much to come off under running water were easily removed with a soft damp cloth. In face, the walking and the cleaning didn't affect the drawn-on patterns at all. Success! The only smudge is from where EJ's ridiculously heavy torch was resting on them in the bag on the way home.
OK, I won't post any more pictures (I have roughly 100... yes I always take things overboard).
Au revoir,
-Eyespiral
Here they are! My beautiful custom gumboots. I may even do some more work on them in the future... depending on how I feel. There's space for more but I do love them as they are.
To replicate these all you need is:
- A clean pair of gumboots - I picked up my pair from Bunnings for $20
- One or more permanent paint markers with a fine nib - I used gold and silver Artline 999XF with a 0.8mm nib
- And internet connection or a library where you can look up examples of the many and varied awesome henna patterns... or, you know, innate artistic talent (I went with the internet connection and the library books as my Mum funnelled all of her drawing talent into my little brother Michael)
I also used a couple of stick-on jewels I had left over from my cake pop bouquets a few years ago. If you're planning on adding anything like that, I suggest using construction adhesive (in careful quantities) because hot glue won't stand the elements (Selleys in a good brand; they even have one specifically for rubber).
Method: Just go for it! Hmm, but if you're concerned about not getting it right first time, I'd recommend first doing some practice on paper. e.g. I made one of my zine-per-diems just henna patterns - they're fun, pretty, easy even if you're not good at drawing, and you end up feeling quite calm and tranquil while you're doing it.
For a great resource on the mechanics of drawing henna patterns, as well as examples of some masterpieces and descriptions of the different styles of henna around the world, check out The Henna Page.
What's the story?
I decided to make these beautiful gumboots for an adventure EJ and I were planning - foraging down an old abandoned train tunnel at Helensburgh. We originally discovered the place while geocaching - Dub Side of the Moon is hidden sneakily at the mouth of the dreamy location. Take a look how romantic a scene it is:
Sorry for the low-quality image - we left the photo-taking 'til the sun was high in the sky and it was a sweltering 40°C, making for harsh lighting conditions. That and trying to hash the image size down for the internet means this doesn't even show you a fraction of how beautiful this place is - if you're anywhere nearby, go and check it out!
Inside there was an escape from the stifling heat, not to mention a canopy of glow worms that have aligned themselves with the old brickwork. The mud is the perfect thick glompy kind, and you see frogs hopping around and other creatures too.
The mud was the reason we left exploring the tunnel for another day - giving me a week to make these babies! Below is a comparison - my gummies in their, uh, natural habitat on the left, and on the right, after our adventure.
Yes, they survived. The mud came off easily, and any spots that had dried too much to come off under running water were easily removed with a soft damp cloth. In face, the walking and the cleaning didn't affect the drawn-on patterns at all. Success! The only smudge is from where EJ's ridiculously heavy torch was resting on them in the bag on the way home.
OK, I won't post any more pictures (I have roughly 100... yes I always take things overboard).
Au revoir,
-Eyespiral
Friday, March 11, 2011
Tuesday, February 8, 2011
Pop-up books, moving books, 3D books
Hello world,
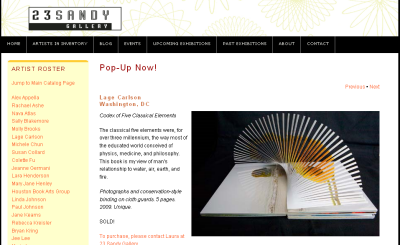
Just quickly - I've had this site saved on my browser tabs for eons now, so I thought I'd share. 23 Sandy Gallery has a great online catalogue of handmade books that do all sorts of interesting things as part of Pop up now!
Jump over there and take a look.
~Eyespiral
Just quickly - I've had this site saved on my browser tabs for eons now, so I thought I'd share. 23 Sandy Gallery has a great online catalogue of handmade books that do all sorts of interesting things as part of Pop up now!
Jump over there and take a look.
~Eyespiral
Wednesday, February 2, 2011
Mobile blogging & new project sneak peak

Just a quick note to test out my mobile blogging function.
I've started work on a quick project involving the sexy item pictured - any idea what to expect? :)
Hopefully I'll share this project with you as soon as Sunday.
- Eyespiral
Sunday, January 30, 2011
mydeck - Personalised playing cards using cityrail train tickets
Hello world,
I should have posted this a while ago but I'll cite the adage "Better late than never" as an excuse.

This was the xmas present I made for my Dad. It was fun to put it all together but I really left most of the work to the last minute. While I'm citing trite adages: "If it weren't for the last minute, nothing would ever get done."
I should also apologise for the low quality photos - I didn't realise until xmas day that I hadn't taken any pictures for my blog, so I snapped a few on my phone while I was at Mum & Dad's place.
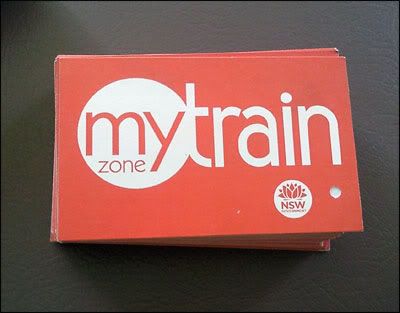
Dad enjoys playing cards (and we all enjoy playing against him slightly less, because he always wins). He's also somewhat tight fisted. And the final ingredient in my idea: I pay a whopping $74 per fortnight on train tickets for work. Together with the fact that there's four kids in our family, two boys for the black suits and two girls for the red suits - what a great concept, I thought.
I had already put together a small collection of train tickets because I like to keep them to use in my Zine per diem project So when I decided this was what I was going to give Dad, I started saving them more, and picking up discarded ones that I found at the station that were still in good nick. I didn't have enough of my own saved up to make a full 54 card deck (52 + 2 jokers).
The train tickets were good because they're all a uniform size, and have a uniform back which is perfect for playing cards.
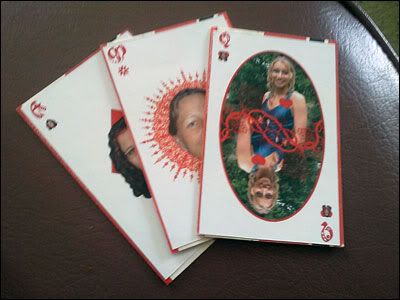
The next step was making the faces. Again I apologies for the really shocking quality of this photo! But hopefully the screencap from InDesign will make up for it.
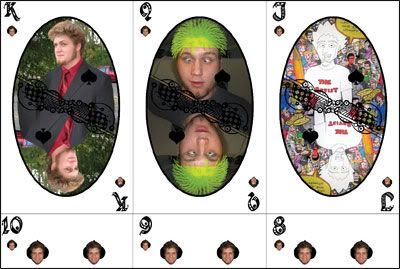
I've uploaded the InDesign CS3 file that I used to print these out. Download it here. The image links will all break because they refer to the original files on my computer, but you can relink them all to your own images to make your own personalised deck!
I printed these on sticky-backed photo paper and proceeded to cut out each card with a pen knife and stick them to the front sides of the train tickets on the night before I was heading down to Mum & Dad's place (and gave myself a painful RSI which felt like a dislocated shoulder after a few hours in the car - ouch!). Do not do it all in the space of a few hours is you can help it - or engage some friends/family to help out and set up your own assembly line.
The final touch was a custom card box. Again, I have uploaded the InDesign CS3 file for anyone to use - just update the text and you're ready to go! Download it here. For fun, and to appeal to my Dad's monetary mind, I summed up the price of each ticket I used and put the total on the box. In effect, he go the most expensive present of anyone that year: $1125.30.
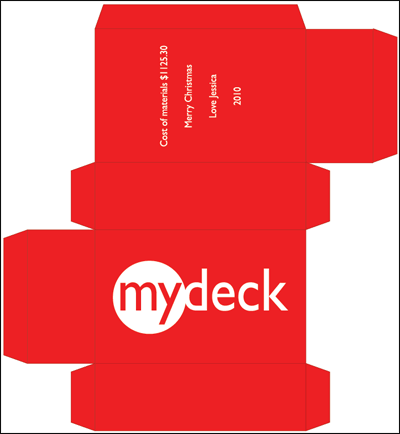
I printed this out on the photo paper, stuck it to a sheet of thin cardboard, cut it out with a pen knife and glued it together. Those lessons in making nets of prisms from primary school is finally paying off!
I hope you enjoyed this one. :)
~Eyespiral
I should have posted this a while ago but I'll cite the adage "Better late than never" as an excuse.
This was the xmas present I made for my Dad. It was fun to put it all together but I really left most of the work to the last minute. While I'm citing trite adages: "If it weren't for the last minute, nothing would ever get done."
I should also apologise for the low quality photos - I didn't realise until xmas day that I hadn't taken any pictures for my blog, so I snapped a few on my phone while I was at Mum & Dad's place.
Dad enjoys playing cards (and we all enjoy playing against him slightly less, because he always wins). He's also somewhat tight fisted. And the final ingredient in my idea: I pay a whopping $74 per fortnight on train tickets for work. Together with the fact that there's four kids in our family, two boys for the black suits and two girls for the red suits - what a great concept, I thought.
I had already put together a small collection of train tickets because I like to keep them to use in my Zine per diem project So when I decided this was what I was going to give Dad, I started saving them more, and picking up discarded ones that I found at the station that were still in good nick. I didn't have enough of my own saved up to make a full 54 card deck (52 + 2 jokers).
The train tickets were good because they're all a uniform size, and have a uniform back which is perfect for playing cards.
The next step was making the faces. Again I apologies for the really shocking quality of this photo! But hopefully the screencap from InDesign will make up for it.
I've uploaded the InDesign CS3 file that I used to print these out. Download it here. The image links will all break because they refer to the original files on my computer, but you can relink them all to your own images to make your own personalised deck!
I printed these on sticky-backed photo paper and proceeded to cut out each card with a pen knife and stick them to the front sides of the train tickets on the night before I was heading down to Mum & Dad's place (and gave myself a painful RSI which felt like a dislocated shoulder after a few hours in the car - ouch!). Do not do it all in the space of a few hours is you can help it - or engage some friends/family to help out and set up your own assembly line.
The final touch was a custom card box. Again, I have uploaded the InDesign CS3 file for anyone to use - just update the text and you're ready to go! Download it here. For fun, and to appeal to my Dad's monetary mind, I summed up the price of each ticket I used and put the total on the box. In effect, he go the most expensive present of anyone that year: $1125.30.
I printed this out on the photo paper, stuck it to a sheet of thin cardboard, cut it out with a pen knife and glued it together. Those lessons in making nets of prisms from primary school is finally paying off!
I hope you enjoyed this one. :)
~Eyespiral
Snag it
Hello world,
Just a real quick one - I recently had the need to do a scrolling screen capture, which sent me on a forage through the internet that led me to TechSmith's SnagIt. This software is very clever and at $49.95 I decided to purchase after my 30 day free trial. It's really useful for me at work where I often put together how-to documentation, and I think it'll also be a great help for this blog, too!
Thought I'd share the love. If you ever need a handy screencap tool which includes editing capabilities, scrolling capture, live links in screen captured PDFs... at least give the trial a go.
~Eyespiral
Just a real quick one - I recently had the need to do a scrolling screen capture, which sent me on a forage through the internet that led me to TechSmith's SnagIt. This software is very clever and at $49.95 I decided to purchase after my 30 day free trial. It's really useful for me at work where I often put together how-to documentation, and I think it'll also be a great help for this blog, too!
Thought I'd share the love. If you ever need a handy screencap tool which includes editing capabilities, scrolling capture, live links in screen captured PDFs... at least give the trial a go.
~Eyespiral
Subscribe to:
Posts (Atom)


 Posts
Posts


